Set up the File Extractor
The Cognite File Extractor is distributed as a Windows executable file. Follow the steps below to set up the extractor.
Before you start
Check the server requirements for the extractor.
Make sure the extractor has the following access capabilities in a Cognite Data Fusion (CDF) project:
files:readandfiles:writeraw:read,raw:write, andraw:listfor state store configured to use CDF RAW.
TipYou can use OpenID Connect and your existing identity provider (IdP) framework to manage access to CDF data securely. Read more.
Set up a Windows Update schedule. Note that the update may reboot the machine, causing extractor downtime.
Navigate to the CDF portal application > Extract data to download the Windows executable file.
Permission issuesSet Modify permission under Properties in the installation folder to avoid permission issues.
Create a configuration file according to the configuration settings. The file must be in YAML format.
Run from a command line
- Navigate to the installation folder in a command line window.
- Run the file_extractor<versionnumber>-<platform_name>.exe file.
The extractor reads and configures the extractor according to the configuration settings.
In this example, the configuration file is named config.yml and saved in the same folder as the executable file:
For Windows:
.\file_extractor-<version>-win32.exe <config-file>
For Linux:
./file_extractor-<version>-linux <config-file>
Automate scheduled runs with the Windows Task Scheduler.
Setup Example - Sharepoint Online
In the steps below you will find the minimal steps required in order to run Cognite File Extractor towards Sharepoint Online.
The steps described here are just an example on how to setup the File Extractor to connect to Sharepoint Online sources. The configuration shared above might change depending on each use case (permissions, restrict access on Sharepoint level, etc)
Create an App Registration
- Go to https://portal.azure.com/#home and login using your Microsoft 365 account (the same you use to login to Sharepoint Online).
- Go to “App Registrations” and create a new app registration which will be used by the Cognite File Extractor in order to connect to Sharepoint Online. Read more.
- After creating your App Registration, you must assign relevant API permissions in order to allow the usage of Microsoft Graph API. Below is an example of a minimal setup in order to allow the File Extractor to read all Sharepoint Online sites.
Sites.Read.All (Type: Application)
User.Read (Type: Delegated)
After finishing the steps metioned above, the API permissions will look like this:
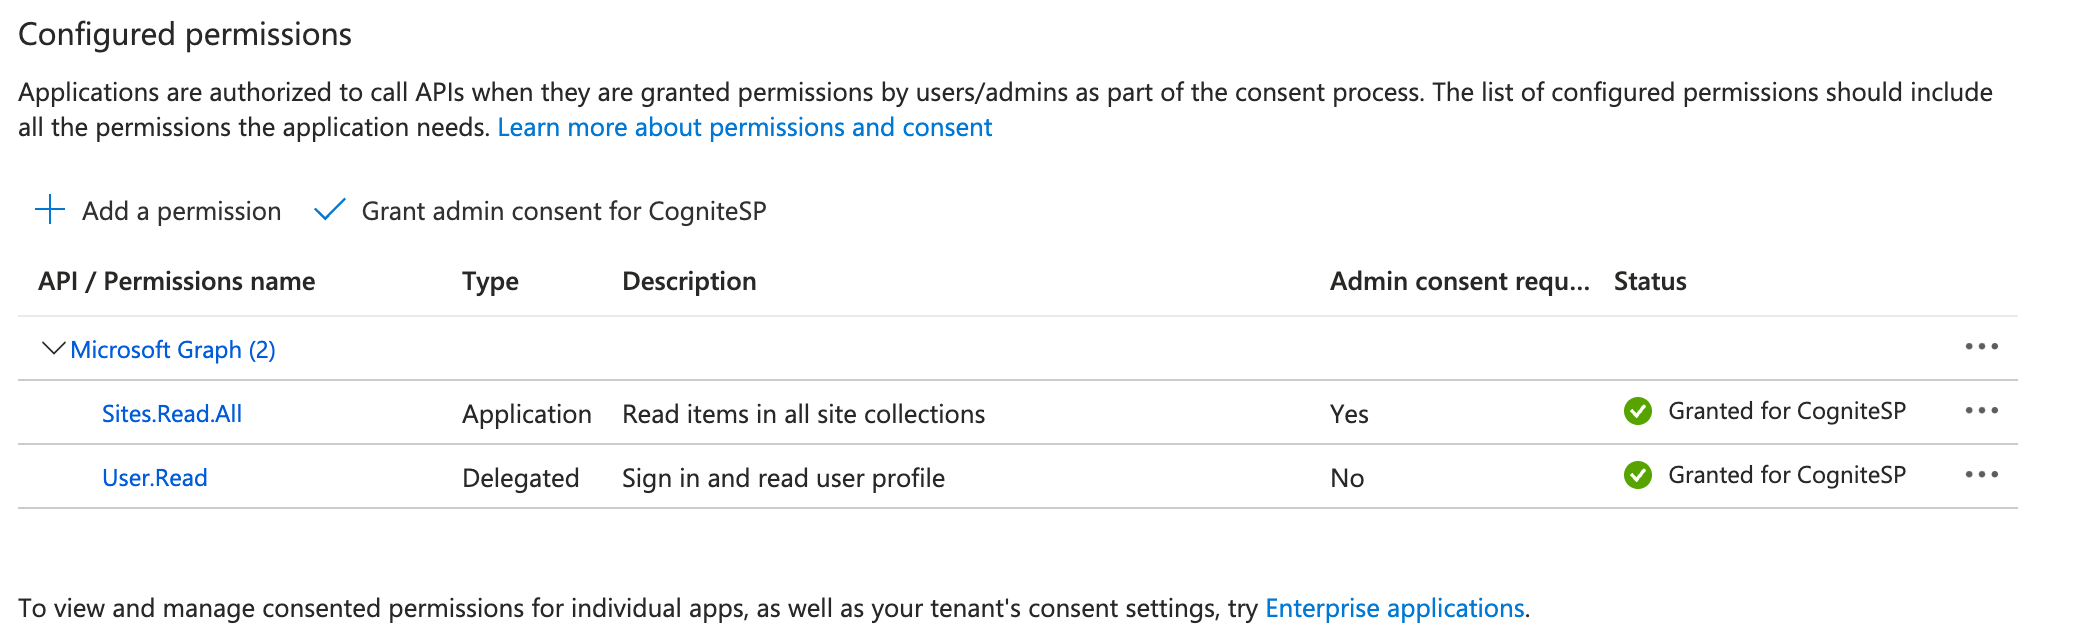
Sharepoint App permission
After creating the App Registration, the same must be added to the Sharepoint administration app registration.
- Go to the following URL in order to create a new sharepoint app permission: https://YOUR-SHAREPOINT-NAME-admin.sharepoint.com/_layouts/15/AppInv.aspx. Make sure to use your Microsoft 365 admin account.
- Set the “App Id” value to the app registration Client ID and click on “Lookup”. The “Lookup” will retrieve and fill up the information with the App registration previously created.
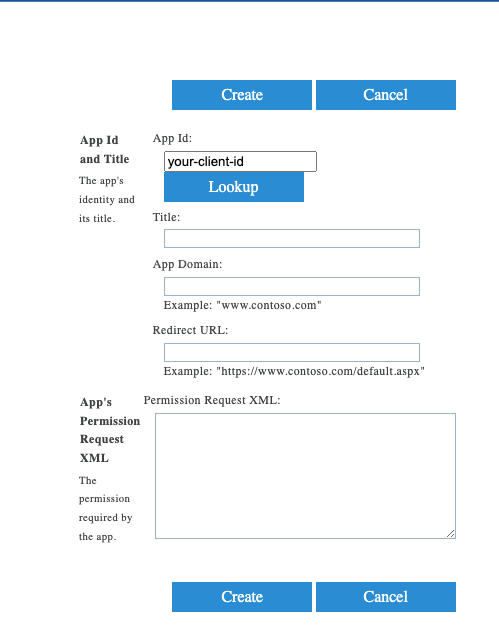
- Set the “App Domain” and “Redirect URL” to your App Registration. For a local execution of the File Extractor, you can set the values to a localhost domain (see below):
App Domain: www.localhost.com
Redirect URL: https://www.localhost.com/default.aspx
- Add the App Permission Request XML in order to configure the Sharepoint permission level. This may very from every configuration scenario. Below you will find a minimal XML in with Read permissions to all Sharepoint sites.
<AppPermissionRequests AllowAppOnlyPolicy="true">
   <AppPermissionRequest Scope="http://sharepoint/content/sitecollection"
    Right=“Read” />
</AppPermissionRequests
The configuration shared above might change depending on each use case (permissions, restrict access on Sharepoint level, etc)
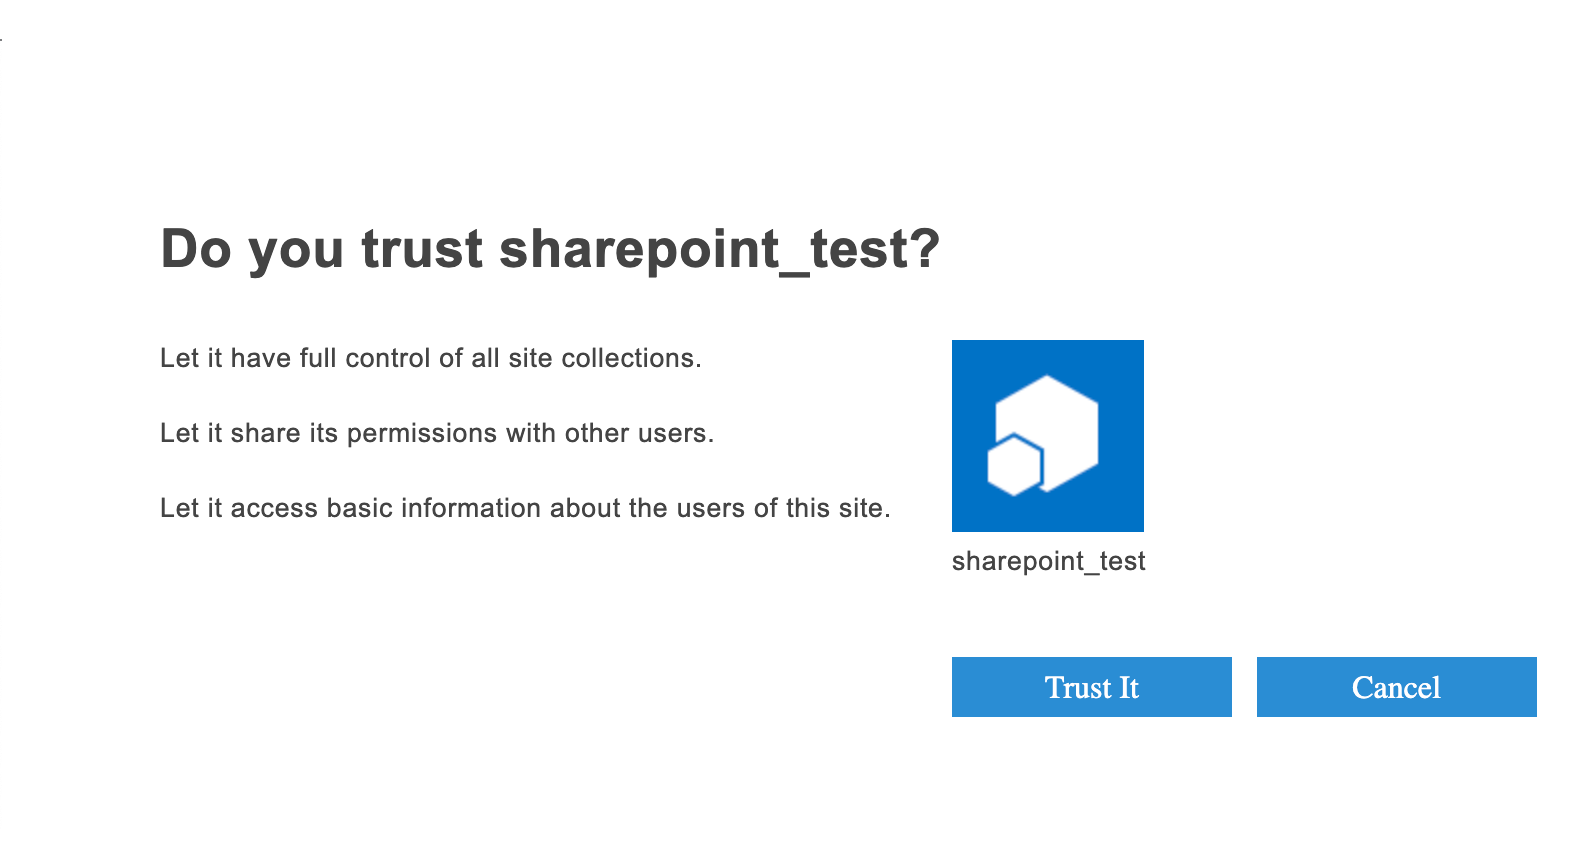
- Click on "Create"
- Sharepoint will ask for a final confirmation after creating the app registration. Click on "Trust It"
Run the extractor
After executing the previous steps, you are ready to extract files from Sharepoint Online.
- Download the Cognite File Extractor from Cognite Data Fusion "Extract Data" page
- Modify the “example-sharepoint.yaml” configuration template, setting the App Registration information and the related Sharepoint configuration parameters.
- Run the extractor. Below you will find a successful execution log example
2023-11-21 09:06:16.564 UTC [INFO    ] ThreadPoolExecutor-0_0 - All files processed. 5 files uploaded
2023-11-21 09:06:16.564 UTC [INFO    ] ThreadPoolExecutor-0_0 - Job "FileExtractor (trigger: interval[0:00:10], next run at: 2023-11-21 10:06:20 CET)" executed successfully
2023-11-21 09:06:20.207 UTC [INFO    ] ThreadPoolExecutor-0_0 - Running job "FileExtractor (trigger: interval[0:00:10], next run at: 2023-11-21 10:06:30 CET)" (scheduled at 2023-11-21 10:06:20.184848+01:00)
- Check the extracted files in Data Explorer.